Inventory transfers are a routine part of warehouse and inventory management in NetSuite. Businesses often need to move items from one bin, location, inventory status, or warehouse zone to another while maintaining accurate inventory records. For simple scenarios, NetSuite provides a basic inventory transfer process that can help users move inventory between bins with minimal setup.
However, many businesses eventually run into limitations with the standard process. When transfers require more filtering, better validation, support for lot or serial-numbered items, inventory status handling, or a review step before submission, the basic process can become manual and error-prone. Users may need to export data, apply filters outside of the transaction flow, and then import the results back into NetSuite.
This is where Smartes’ Advanced Inventory Transfer solution provides additional value. Instead of relying on a separate saved search export and import process, the advanced solution gives users a guided NetSuite interface with configurable filters, review screens, dry-run validation, and account-specific field behavior. The solution is designed to help businesses perform more complex inventory transfers with greater accuracy, visibility, and control.
In this article, we compare the standard Simple Inventory Transfer process with the Smartes Advanced Inventory Transfer solution. First, we will walk through how a simple transfer works in NetSuite. Then, we will explain how the advanced solution improves the process for businesses that need more flexibility, stronger validation, and a more streamlined user experience.
Simple vs. Advanced Inventory Transfer
The Simple Inventory Transfer process is best suited for straightforward inventory movements where users already know the source bin, destination bin, and items involved. It can work well for routine transfers, but it relies heavily on saved search exports, manual filtering, and import accuracy.
The Advanced Inventory Transfer solution is designed for more complex transfer scenarios. It allows users to filter inventory directly inside NetSuite, review the data before submission, validate results through a dry run, and complete the transfer without a separate import step. It also adapts to enabled NetSuite features such as bin management, inventory status, lot numbers, and serial numbers.
| Area | Simple Inventory Transfer | Advanced Inventory Transfer |
|---|---|---|
| Best for | Basic bin-to-bin movement | Complex or controlled inventory movement |
| Filtering | Done through saved search filters | Done directly in the transfer interface |
| Import required | Yes | No separate import required |
| Review step | Limited | Built-in review page |
| Validation | Import may fail if data is incorrect | Dry run allows users to validate before final submission |
| Configuration | Minimal | Uses a configurable setup record |
| Feature handling | More manual | Adapts based on enabled NetSuite features |
1. How NetSuite’s Simple Inventory Transfer Works
- First, navigate to Setup > Import/Export > Bin Transfer Import.
- Export Data:
- Use the link provided to access a saved search.
- This search outputs all available bins.
- Apply Filters:
- Next, in the saved search, apply filters to locate specific bins as required.
- Specify Destination:
- Define the “To Bin” to designate where the inventory should be moved.
- Validation:
- The import process will automatically fail if an incorrect bin is specified.
Points to Note:
- Ensure correct bins are selected to avoid failed transfers.
- Filters aid in efficient and accurate bin selection.
Cons of Simple Inventory Transfer
The Simple Inventory Transfer in NetSuite, while user-friendly and straightforward for basic inventory moves, comes with certain limitations that can impede more complex operations.
One notable drawback is the inflexibility of the saved search import function; specific columns are immutable, and any attempt to alter them can result in the import failing, leading to inefficiencies and potential for error. Furthermore, because the saved search operates independently of the transfer process, NetSuite lacks the ability to directly capture and respond to the user’s filtering choices. This disconnect means users must manually import the filtered data back into NetSuite to execute the transfer, a step that can be both time-consuming and prone to data entry errors, making the Simple Inventory Transfer less suited for nuanced or elaborate inventory management tasks.
The Simple Inventory Transfer is an essential function within NetSuite that facilitates quick and direct inventory movements. By adhering to the steps outlined in this documentation and ensuring accurate selection of bins and destination points, users can efficiently manage their inventory transfers, maintain inventory accuracy, and optimize their warehouse operations.
Why Use an Advanced Inventory Transfer Process?
The Simple Inventory Transfer process can be effective for basic movements, but it becomes less efficient when users need to transfer inventory based on multiple criteria. For example, a business may need to filter by location, subsidiary, inventory status, bin, lot number, or serial number before deciding what should be moved.
In these cases, the advanced process reduces manual effort by keeping the filtering, review, validation, and submission steps inside NetSuite. This helps users avoid unnecessary exports and imports while giving them more confidence that the correct inventory is being transferred.
2. How Smartes’ Advanced Inventory Transfer Works
In contrast, the Advanced Inventory Transfer process represents a sophisticated approach to managing inventory within NetSuite. It eliminates the need for exporting and importing via saved searches by employing dynamic filters that interact with a configurable record. This process caters to more complex inventory management requirements, allowing users to filter by subsidiary, location, “To Bin,” and inventory status. It also adapts to the specific features of the user’s NetSuite account, such as serial and lot number tracking, and bin management, providing a tailored and flexible inventory transfer experience.
- First, navigate to Transactions > Adv. Inventory Transfers > Bin Transfer to begin the process.
- On the EAW Advanced Inventory Transfer Configuration record, define transfer settings.
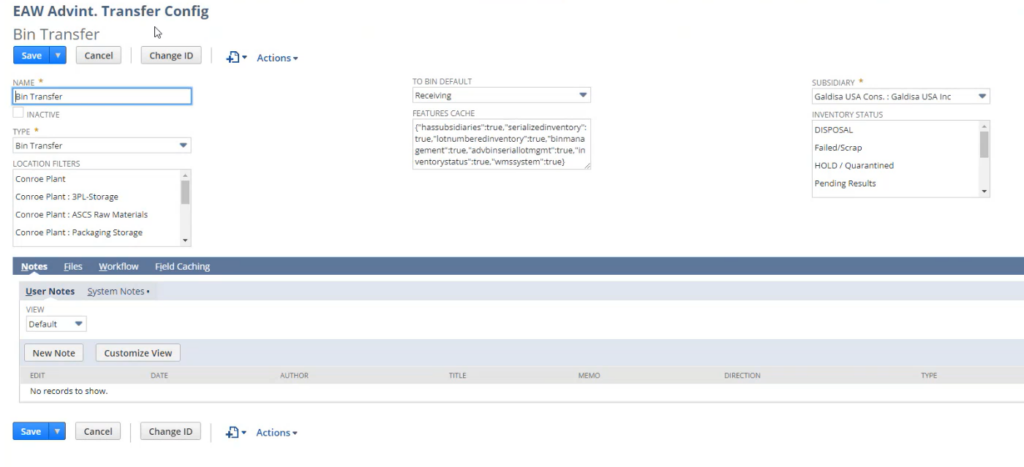
Configuration Details
- Name and Type: Assign a name and select ‘Bin Transfer’ as the type.
- Location Filters: Select from predefined locations for the transfer origin.
- To Bin Default: Choose a default destination bin.
- Features Cache: Auto-detected features are listed, reflecting account capabilities.
- Subsidiary: Select the applicable subsidiary.
- Inventory Status: Choose the inventory status from options like DISPOSAL, HOLD, etc.
- Save Configuration: Save the settings with the ‘Save’ button.
- Feature-Based Display:
- The system dynamically checks for features like serial number, lot number, and bin management in the user’s account.
- Fields are displayed or hidden based on the available features.
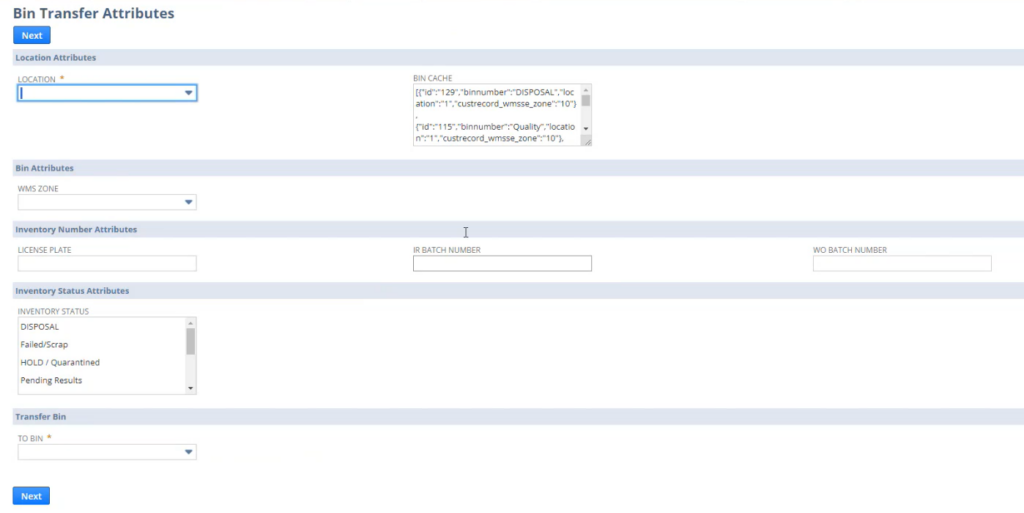
Define Transfer Attributes on Bin Transfer Attributes Page
- Location Attributes: Select the current item location.
- Bin Attributes: Specify the warehouse management zone.
- Inventory Number Attributes: Input applicable batch numbers.
- Inventory Status Attributes: Set the current inventory status.
- Transfer Bin: Choose the destination bin.
- Review and Save: Confirm attribute accuracy and proceed.
Verify Transfer Details
Then, after setting attributes, verify transfer details on the Review Data page.
- Line Item Review: Ensure all line item details are correct.
- Data Verification: Match inventory numbers and quantities with physical inventory.
- Data Consistency: Check consistency with configuration settings.
- Error Correction: Use ‘Back’ to correct any discrepancies.
- Final Check: Perform a last review before submission.
- Initiate Transfer: Click ‘Next’ after the final review to submit the transfer for processing.

Dry Run: After entering the filter criteria and reviewing the output data, click ‘Next’ for a dry run. This step is crucial to ensure the accuracy of the filtered data before the final transfer.
Final Submission: Following the dry run, review the data once more and click ‘Next’ to submit the transfer data for processing.
Benefits of Advanced Inventory Transfer
In contrast, the Advanced Inventory Transfer solution in NetSuite offers a robust and integrated approach to managing complex inventory needs. This sophisticated system bypasses the need for separate data imports by utilizing dynamic, in-app filters that automatically display the relevant data based on user input. It offers a seamless transition from filtering to transfer, significantly reducing the risk of data inconsistencies and import errors.
Additionally, the Advanced Inventory Transfer adapts to the specific features of the user’s account settings, such as bin management, lot, and serial number tracking, providing a customized and comprehensive transfer experience. This level of integration and adaptability not only enhances accuracy but also empowers users to perform more nuanced inventory management tasks with ease, making it an ideal solution for businesses looking to optimize their inventory processes.
Points to Note
- Result Limitation for Submission: Users must ensure that the filtered results are fewer than 300 records. If the results exceed this number, the submission button will not be displayed, and the transfer cannot be initiated. This limit is in place to ensure system performance and data accuracy.
- Configuration Record Dependency: The transfer process relies on the Custom Record: EAW Advint. Transfer Config List. Users need to ensure that this configuration record is correctly set up before initiating the transfer to ensure the filtering works as intended.
- Account Features Integration: The Advanced Inventory Transfer solution dynamically interacts with the account’s enabled features, such as bin management and lot/serial numbers. The system will automatically display or hide fields based on these features.
- Filtering and Data Output: Unlike the simple inventory transfer, the advanced system directly uses the user’s input to filter and output data, streamlining the process and ensuring that only relevant data is reviewed and submitted.
- No Separate Data Import Required: The advanced process eliminates the need for a separate data import step, reducing the time and potential errors associated with manual data handling.
- Dry Run Functionality: Users are encouraged to utilize the dry run feature to validate the data before the final submission, which can help identify and rectify potential issues early in the process.
- User Interface Adaptability: The interface will adapt based on the user’s filtering choices, providing a more intuitive and responsive experience.
- Real-Time Data Reflection: As users apply filters, the system reflects changes in real-time, ensuring that the transfer is based on the most current and accurate inventory data.
- Comprehensive Review Step: A detailed review step is integral to the process, allowing for a thorough verification of all the transfer details on the Review Data page before final submission.
Conclusion
NetSuite’s standard Simple Inventory Transfer process is useful for basic inventory movement, especially when the transfer is straightforward and does not require advanced filtering or review. However, businesses with more complex inventory operations often need additional control. When transfers involve multiple locations, subsidiaries, inventory statuses, bins, lot numbers, or serial numbers, the simple process can create extra manual work. Users may need to export saved search results, apply filters, prepare import data, and rely on the import process to catch errors.
Smartes’ Advanced Inventory Transfer solution improves this workflow by bringing the process into a guided NetSuite interface. Users can apply filters, review transfer data, perform a dry run, and submit the final transfer without managing a separate import file. This creates a more streamlined and reliable process for teams that need better visibility and accuracy when moving inventory.
For businesses that only need occasional, simple bin transfers, the standard process may be sufficient. But for teams managing higher-volume or more complex inventory movements, Advanced Inventory Transfer provides a more flexible and controlled way to complete transfers directly in NetSuite. Contact us to learn how you can install this solution in your NetSuite environment.